This document provides a guide to use the JMeter validation service, which is introduced in the Clover Gambia release.
Apache JMeter is a mature, open source application that supports web client emulation. Its functionality has been integrated into the Clover project to allow various CI validations and performance tests to be performed. The system under test can either be REST services/APIs directly or a set of L7 network services. In the latter scenario, Clover nginx servers may be employed as an endpoint to allow traffic to be sent end-to-end across a service chain.
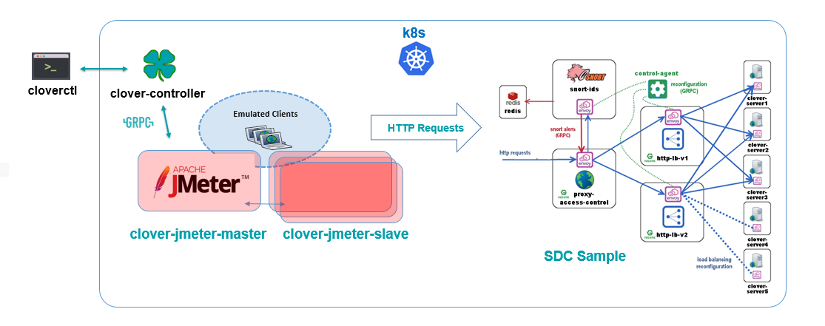
The Clover JMeter integration is packaged as docker containers with manifests to deploy in a Kubernetes (k8s) cluster. The Clover CLI (cloverctl) can be used to configure and control the JMeter service within the k8s cluster via clover-controller.
The Clover JMeter integration has the following attributes:
- Master/Slave Architecture: uses the native master/slave implementation of JMeter. The master and slaves have distinct OPNFV docker containers for rapid deployment and usage. Slaves allow the scale of the emulation to be increased linearly for performance testing. However, for functional validations and modest scale, the master may be employed without any slaves.
- Test Creation & Control: JMeter makes use of a rich XML-based test plan. While this offers a plethora of configurable options, it can be daunting for a beginner user to edit directly. Clover provides an abstracted yaml syntax exposing a subset of the available configuration parameters. JMeter test plans are generated on the master and tests can be started from cloverctl CLI.
- Result Collection: summary log results and detailed per-request results can be retrieved from the JMeter master during and after tests from the cloverctl or from a REST API exposed via clover-controller.
The following assumptions must be met before continuing on to deployment:
- Installation of Docker has already been performed. It’s preferable to install Docker CE.
- Installation of k8s in a single-node or multi-node cluster.
- Clover CLI (cloverctl) has been downloaded and setup. Instructions to deploy can be found at Deploying clover-controller
- The clover-controller service is deployed in the k8s cluster the validation services will be deployed in. Instructions to deploy can be found at Deploying clover-controller.
The easiest way to deploy Clover JMeter validation services into your k8s cluster is to use the cloverctl CLI using the following command:
$ cloverctl create system validation
Container images with the Gambia release tag will pulled if the tag is unspecified. The release tag is opnfv-7.0.0 for the Gambia release. To deploy the latest containers from master, use the command shown below:
$ cloverctl create system validation -t latest
The Clover CLI will add master/slave pods to the k8s cluster in the default namespace.
The JMeter master/slave docker images will automatically be pulled from the OPNFV public Dockerhub registry. Deployments and respective services will be created with three slave replica pods added with the clover-jmeter-slave prefix. A single master pod will be created with the clover-jmeter-master prefix.
To continue to deploy from the source code, clone the Clover git repository and navigate within to the directory, as shown below:
$ git clone https://gerrit.opnfv.org/gerrit/clover
$ cd clover/clover/tools/jmeter/yaml
$ git checkout stable/gambia
To deploy the master use the following two commands, which will create a manifest with the Gambia release tags and creates the deployment in the k8s cluster:
$ python render_master.py --image_tag=opnfv-7.0.0 --image_path=opnfv
$ kubectl create -f clover-jmeter-master.yaml
JMeter can be injected into an Istio service mesh. To deploy in the default namespace within the service mesh, use the following command for manual sidecar injection:
$ istioctl kube-inject -f clover-jmeter-master.yaml | kubectl apply -f -
Note, when injecting JMeter into the service mesh, only the master will function for the Clover integration, as master-slave communication is known not to function with the Java RMI API. Ensure ‘istioctl’ is in your path for the above command.
To deploy slave replicas, render the manifest yaml and create in k8s adjusting the
--replica_count value for the number of slave pods desired:
$ python render_slave.py --image_tag=opnfv-7.0.0 --image_path=opnfv --replica_count=3
$ kubectl create -f clover-jmeter-slave.yaml
To verify the validation services are deployed, ensure the following pods are present with the command below:
$ kubectl get pod --all-namespaces
The listing below must include the following pods assuming deployment in the default namespace:
NAMESPACE   NAME                                       READY      STATUS
default     clover-jmeter-master-688677c96f-8nnnr       1/1       Running
default     clover-jmeter-slave-7f9695d56-8xh67         1/1       Running
default     clover-jmeter-slave-7f9695d56-fmpz5         1/1       Running
default     clover-jmeter-slave-7f9695d56-kg76s         1/1       Running
default     clover-jmeter-slave-7f9695d56-qfgqj         1/1       Running
To employ a test plan that can be used against the Clover SDC Sample Configuration Guide sample, navigate to cloverctl yaml directory and use the sample named ‘jmeter_testplan.yaml’, which is shown below.
load_spec:
    num_threads: 5
    loops: 2
    ramp_time: 60
    duration: 80
url_list:
    - name: url1
      url: http://proxy-access-control.default:9180
      method: GET
      user-agent: chrome
    - name: url2
      url: http://proxy-access-control.default:9180
      method: GET
      user-agent: safari
load_spec section of the yaml defines the load profile of the test.ramp_time determines the rate at which threads/users will be setup.loop parameter reruns the same test and can be set to 0 to loop forever.duration parameter is used to limit the test run time and be used as a hard cutoff when
using loop forever.url_list section of the yaml defines a set of HTTP requests that each user will perform.
It includes the request URL that is given a name (used as reference in detailed per-request
results) and the HTTP method to use (ex. GET, POST). The user-agent parameter allows this
HTTP header to be specified per request and can be used to emulate browsers and devices.The url syntax is <domain or IP>:<port #>. The colon port number may be omitted if port 80
is intended.
The test plan yaml is an abstraction of the JMeter XML syntax (uses .jmx extension) and can be pushed to the master using the cloverctl CLI with the following command:
$ cloverctl create testplan –f jmeter_testplan.yaml
The test plan can now be executed and will automatically be distributed to available JMeter slaves.
Once a test plan has been created on the JMeter master, a test can be started for the test plan with the following command:
$ cloverctl start testplan
The test will be executed from the clover-jmeter-master pod, whereby HTTP requests will originate directly from the master. The number of aggregate threads/users and request rates can be scaled by increasing the thread count or decreasing the ramp time respectively in the test plan yaml. However, the scale of the test can also be controlled by adding slaves to the test. When slaves are employed, the master will only be used to control slaves and will not be a source of traffic. Each slave pod will execute the test plan in its entirety.
To execute tests using slaves, add the flag ‘-s’ to the start command from the Clover CLI as shown below:
$ cloverctl start testplan –s <slave count>
The clover-jmeter-slave pods must be deployed in advance before executing the above command. If the steps outlined in section Deploy with Clover CLI have been followed, three slaves will have already been deployed.
Results for the test can be obtained by executing the following command:
$ cloverctl get testresult
$ cloverctl get testresult log
The bottom of the log will display a summary of the test results, as shown below:
3  in 00:00:00 =  111.1/s Avg:     7 Min:     6 Max:     8 Err:     0 (0.00%)
20 in 00:00:48 =    0.4/s Avg:    10 Min:     6 Max:    31 Err:     0 (0.00%)
Each row of the summary table is a snapshot in time with the final numbers in the last row. In this example, 20 requests (5 users/threads x 2 URLs) x loops) were sent successfully with no HTTP responses with invalid/error (4xx/5xx) status codes. Longer tests will produce a larger number of snapshot rows. Minimum, maximum and average response times are output per snapshot.
To obtain detailed, per-request results use the detail option, as shown below:
$ cloverctl get testresult detail

1541567388622,14,url1,200,OK,ThreadGroup 1-4,text,true,,843,0,1,1,14,0,0
1541567388637,8,url2,200,OK,ThreadGroup 1-4,text,true,,843,0,1,1,8,0,0
1541567388646,6,url1,200,OK,ThreadGroup 1-4,text,true,,843,0,1,1,6,0,0
1541567388653,7,url2,200,OK,ThreadGroup 1-4,text,true,,843,0,1,1,7,0,0
1541567400622,12,url1,200,OK,ThreadGroup 1-5,text,true,,843,0,1,1,12,0,0
1541567400637,8,url2,200,OK,ThreadGroup 1-5,text,true,,843,0,1,1,8,0,0
1541567400645,7,url1,200,OK,ThreadGroup 1-5,text,true,,843,0,1,1,7,0,0
1541567400653,6,url2,200,OK,ThreadGroup 1-5,text,true,,843,0,1,1,6,0,0
elapsed or Latency values are in milliseconds.
When you’re finished working with JMeter validation services, you can uninstall it with the following command:
$ cloverctl delete system validation
The command above will remove the clover-jmeter-master and clover-jmeter-slave deployment and service resources from the current k8s context.
The JMeter validation services can be uninstalled from the source code using the commands below:
$ cd clover/samples/scenarios
$ kubectl delete -f clover-jmeter-master.yaml
$ kubectl delete -f clover-jmeter-slave.yaml
The OPNFV docker images can be removed with the following commands from nodes in the k8s cluster.
$ docker rmi opnfv/clover-jmeter-master
$ docker rmi opnfv/clover-jmeter-slave
$ docker rmi opnfv/clover-controller