This document provides a guide to setup the spinnaker in kubernetes as a continuous delivery platform.
Spinnaker is an open-source, multi-cloud continuous delivery platform that helps you release software changes with high velocity and confidence.
Spinnaker provides two core sets of features:
1. application management
You use Spinnaker’s application management features to view and manage your cloud resources.
2. application deployment
You use Spinnaker’s application deployment features to construct and manage continuous delivery workflows.
For more information on Spinnaker and its capabilities, please refer to documentation.
The following assumptions must be met before continuing on to deployment:
- Ubuntu 16.04 was used heavily for development and is advised for greenfield deployments.
- Installation of Docker has already been performed. It’s preferable to install Docker CE.
- Installation of Kubernetes has already been performed.
- A PersistentVolume resource need to be setup in k8s for the PersistentVolumeClaim to use. we supply the manifest file minio-pv.yml to create the PV, But it is not suitable for use in production.
Clone the Clover git repository and navigate within the samples directory as shown below:
$ git clone https://gerrit.opnfv.org/gerrit/clover
$ cd clover/clover/spinnaker/install
$ git checkout stable/gambia
To deploy the Spinnaker in the “spinnaker” Kubernetes namespace, use the following command:
$ kubectl create -f quick-install-spinnaker.yml
To verify the Spinnaker pods is deployed, executing the command below:
$ kubectl get pod -n spinnaker
The listing below must include the following Spinnaker pods:
$ NAME                              READY     STATUS    RESTARTS   AGE
minio-deployment-5d84f45dd5-zjdzb   1/1       Running   0          22h
spin-clouddriver-795575c5cb-ph8qc   1/1       Running   0          22h
spin-deck-7c5d75bfcd-vr58q          1/1       Running   0          22h
spin-echo-7986796c94-4285v          1/1       Running   0          22h
spin-front50-5744674fdc-d9xsw       1/1       Running   0          22h
spin-gate-7978d55d57-jcsmq          1/1       Running   0          22h
spin-halyard                        1/1       Running   0          22h
spin-igor-6f8c86bbbb-cs8gd          1/1       Running   0          22h
spin-orca-8659c57c5c-rs69z          1/1       Running   0          22h
spin-redis-558db8d5bd-kdmjz         1/1       Running   0          22h
spin-rosco-dfbbcbccd-db65b          1/1       Running   0          22h
To verify the Spinnaker services is created, executing the command below:
$ kubectl get svc -n spinnaker
The listing below must include the following Spinnaker services:
$ NAME             TYPE        CLUSTER-IP      EXTERNAL-IP   PORT(S)    AGE
minio-service      ClusterIP   10.233.21.175   <none>        9000/TCP   22h
spin-clouddriver   ClusterIP   10.233.9.27     <none>        7002/TCP   22h
spin-deck          ClusterIP   10.233.34.86    <none>        9000/TCP   22h
spin-echo          ClusterIP   10.233.29.150   <none>        8089/TCP   22h
spin-front50       ClusterIP   10.233.5.221    <none>        8080/TCP   22h
spin-gate          ClusterIP   10.233.33.196   <none>        8084/TCP   22h
spin-halyard       ClusterIP   10.233.2.187    <none>        8064/TCP   22h
spin-igor          ClusterIP   10.233.29.93    <none>        8088/TCP   22h
spin-orca          ClusterIP   10.233.23.140   <none>        8083/TCP   22h
spin-redis         ClusterIP   10.233.20.95    <none>        6379/TCP   22h
spin-rosco         ClusterIP   10.233.48.79    <none>        8087/TCP   22h
To publish the spin-deck service, we need change the type to NodePort, executing the command below:
$ kubectl get svc spin-deck -n spinnaker -o yaml |sed 's/ClusterIP/NodePort/' |kubectl replace -f -
$ kubectl get svc -n spinnaker
The listing below must include the following services
$ NAME             TYPE        CLUSTER-IP      EXTERNAL-IP   PORT(S)          AGE
minio-service      ClusterIP   10.233.21.175   <none>        9000/TCP         22h
spin-clouddriver   ClusterIP   10.233.9.27     <none>        7002/TCP         22h
spin-deck          NodePort    10.233.34.86    <none>        9000:31747/TCP   22h
spin-echo          ClusterIP   10.233.29.150   <none>        8089/TCP         22h
spin-front50       ClusterIP   10.233.5.221    <none>        8080/TCP         22h
spin-gate          ClusterIP   10.233.33.196   <none>        8084/TCP         22h
spin-halyard       ClusterIP   10.233.2.187    <none>        8064/TCP         22h
spin-igor          ClusterIP   10.233.29.93    <none>        8088/TCP         22h
spin-orca          ClusterIP   10.233.23.140   <none>        8083/TCP         22h
spin-redis         ClusterIP   10.233.20.95    <none>        6379/TCP         22h
spin-rosco         ClusterIP   10.233.48.79    <none>        8087/TCP         22h
In your browser, navigate to the following URLs for Spinnaker respectively:
http://<node IP>:31747
Where node IP is an IP from one of the Kubernetes cluster node(s).

When the default installation is ready, there are many different components that you can turn on with Spinnaker. In order to customize Spinnaker, you can use the halyard command line or clover command line to edit the configuration and apply it to what has already been deployed.
Halyard has an in-cluster daemon that stores your configuration. You can exec a shell in this pod to make and apply your changes.
For example:
$ kubectl exec spin-halyard -n spinnaker -it -- bash -il
spinnaker@spin-halyard:/workdir$ hal version list
How to use the halyard command line to configurate the spinnaker, please refer to commands documentation.
Clover provider the cloverctl and clover-controller to controll the server. So we can use the cloverctl to configurate the spinnaker. So far, clover provide the capabilities to create/get/delete docker-registry and kubernetes provider in spinnaker.
NOTE: Before using clover command, you need build the clover command and setup the clover-controller in your local kubernetes cluster, where spinnaker deploy in.
You need a configuration file written in YAML that describe the information about you Docker Registry as shown below:
docker.yml:
name: mydockerhub
address: https://index.docker.io
username: if-you-images-aren't-publicly-available
password: fill-this-field
repositories:
- opnfv/clover
If any of your images aren’t publicly available, you need fill your DockerHub username & password. Ortherwise you can delete the username & password field.
Creating the Docker Registry in spinnaker:
$ cloverctl create provider docker-registry -f docker.yml
Getting the Docker Registry in spinnaker:
$ cloverctl get provider docker-registry
Deleting the Docker Registry in spinnaker:
$ cloverctl delete provider docker-registry -n dockerhub
By default, installing the manifest only registers the local cluster as a deploy target for Spinnaker. If you want to add arbitrary clusters you can use the cloverctl command
You need a running Kubernetes cluster, with corresponding credentials in a kubeconfig file(/path/to/kubeconfig). And You also need a configuration file written in YAML that describe the information about your kubernetes cluseter as shown below:
kubernetes.yml:
# name must match pattern ^[a-z0-9]+([-a-z0-9]*[a-z0-9])?$'
name: my-kubernetes
providerVersion: V1
# make sure the kubeconfigFile can be use
kubeconfigFile: /path/to/kubeconfig
dockerRegistries:
- accountName: dockerhub
Creating the kubernetes provider in spinnaker:
$ cloverctl create provider kubernetes -f kubernetes.yml
Getting the kubernetes provider in spinnaker:
$ cloverctl get provider kubernetes
Deleting the kubernetes provider in spinnaker:
$ cloverctl delete provider kubernetes -n my-kubernetes
Currently, spinnaker support to deploy applications with the helm chart. More information please refer to Deploy Helm Charts.
Before doing this, please package the helm chart first. how to package the chart, refer to helm documentation.
$ wget https://dl.minio.io/client/mc/release/linux-amd64/mc
$ chmod +x mc
$ ./mc config host add my_minio  http://{minio-service-ip}:9000 dont-use-this for-production S3v4
$ ./mc mb my_minio/s3-account
$ ./mc cp test-0.1.0.tgz my_minio/s3-account/test-0.1.0.tgz
NOTE: the minio-service-ip is 10.233.21.175 in this example
This pipeline include three stages,configuration, bake and deploy.
We can configure Automated triggers and expected artifacts in this stage. We just declare expected artifacts and trigger the pipeline manually.
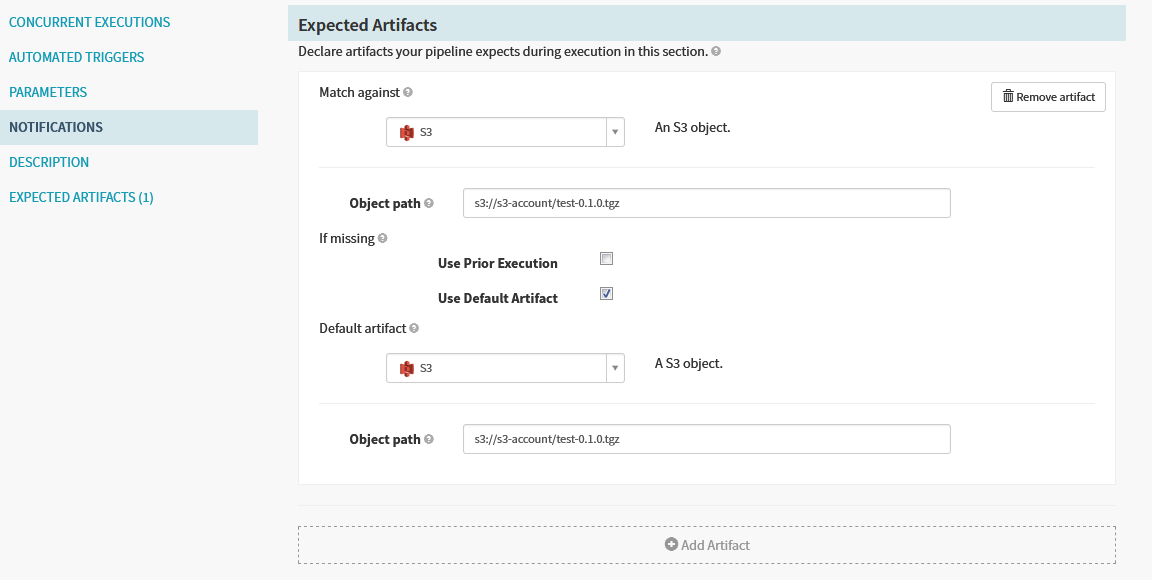
NOTE: We need to enable “Use Default Artifact”, when we need trigger the pipeline manually
For example, we have a test “Bake(Manifest)” stage below
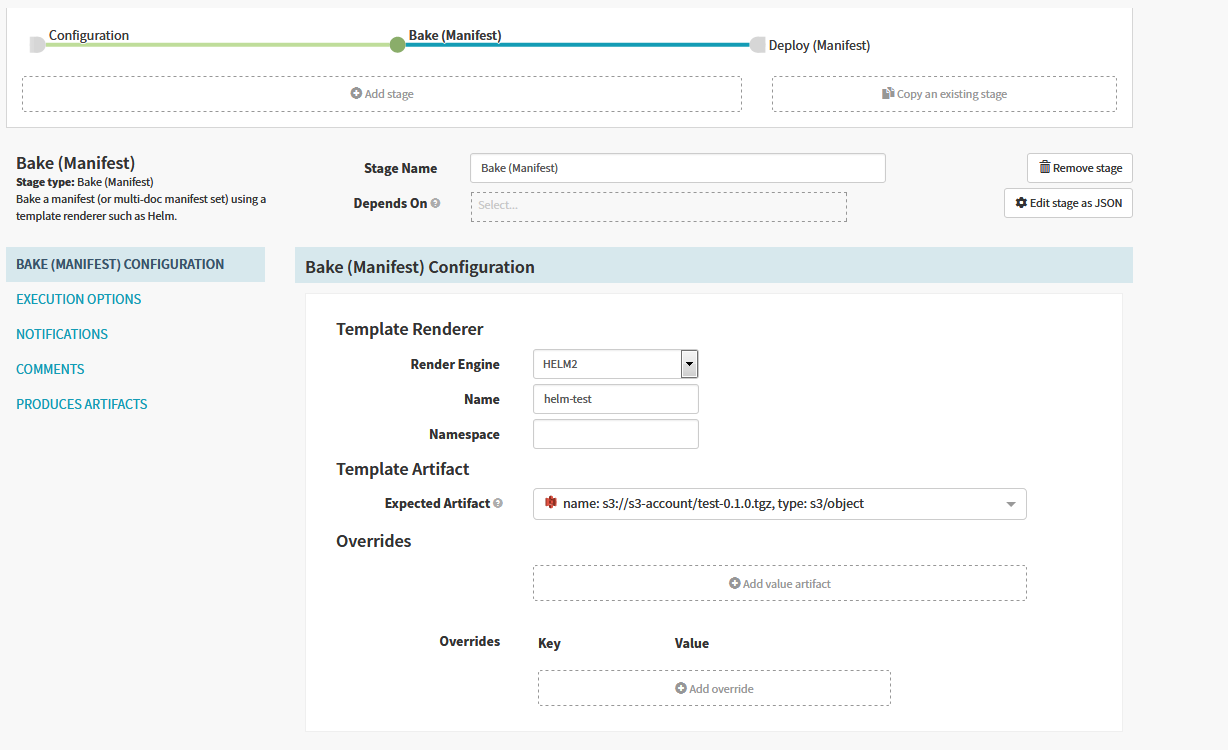
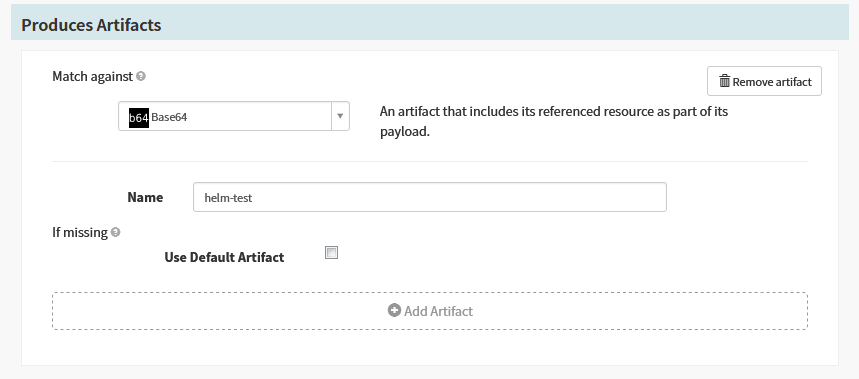
Spinnaker has automatically created an embedded/base64 artifact that is bound when the stage completes, representing the fully baked manifest set to be deployed downstream.
After the chart was baked by helm, we can configure a “Deploy(Manifest)” stage to deploy the manifest produced by previous stage as shown below.
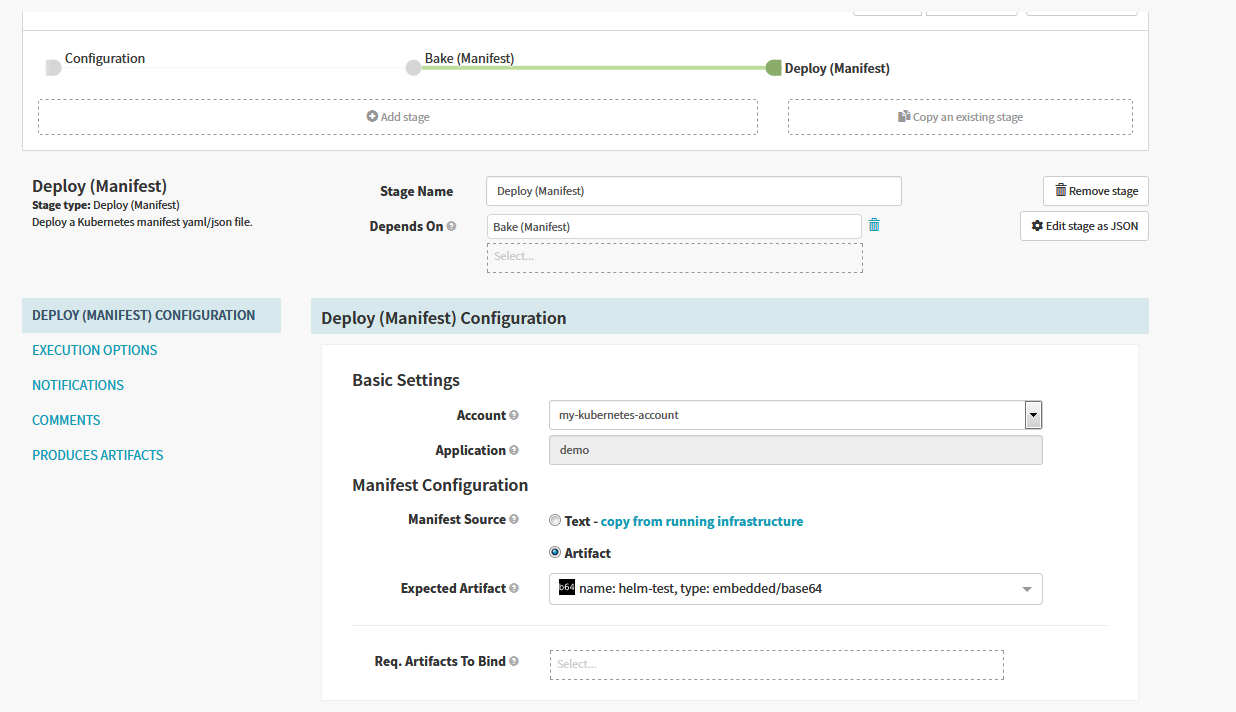
Once this pipeline runs completely, you can see every resource in your Helm chart get deployed.